


1.服务器配置以支持并发。
1.1设置服务器配置。
vim /etc/security/limits.conf #最后面添加
	* soft nofile 65535
	* hard nofile 65535
vim /etc/profile #最后面添加
ulimit -s 102400
ulimit -n 102400
vim /etc/sysctl.conf #最后面添加
net.ipv6.conf.all.disable_ipv6 = 1
net.ipv6.conf.default.disable_ipv6 = 1
net.ipv6.conf.lo.disable_ipv6 = 1
net.ipv4.neigh.default.gc_stale_time=120


# see details in https://help.aliyun.com/knowledge_detail/39428.html
 net.ipv4.conf.all.rp_filter=0
 net.ipv4.conf.default.rp_filter=0
 net.ipv4.conf.default.arp_announce = 2
 net.ipv4.conf.lo.arp_announce=2
 net.ipv4.conf.all.arp_announce=2

# # see details in https://help.aliyun.com/knowledge_detail/41334.html
 kernel.sysrq = 1
 fs.file-max = 6553560
 net.ipv4.ip_forward = 1
 net.ipv4.tcp_fin_timeout = 30
 net.ipv4.tcp_max_syn_backlog = 10240
 net.ipv4.tcp_keepalive_time = 1200
 net.ipv4.tcp_synack_retries = 3
 net.ipv4.tcp_syn_retries = 3
 net.ipv4.tcp_max_orphans = 102400
 net.ipv4.tcp_max_tw_buckets = 5000
 net.ipv4.tcp_window_scaling = 0
 net.ipv4.tcp_sack = 0
 net.ipv4.tcp_timestamps = 0
 net.ipv4.tcp_syncookies = 1
 #打开重用(主要)
 net.ipv4.tcp_tw_reuse = 1
 #打开快速回收(主要)
 net.ipv4.tcp_tw_recycle = 1
 #可使用端口范围(主要)
 net.ipv4.ip_local_port_range = 1024 65000
执行使生效
sysctl -p
另外配置参考地址
https://cloud.tencent.com/developer/article/1181929
https://www.louxiaohui.com/2020/02/12/nginx-failed-24-Too-many-oppen-files/
https://cloud.tencent.com/document/product/457/48142
2.nginx代理k8s等代理会影响吞吐量。
nginx配置如下
当超时时
优化文档:http://mailman.nginx.org/pipermail/nginx/2019-June/058036.html
#user  nobody;
#worker_processes  2;

#error_log  logs/error.log;
#error_log  logs/error.log  notice;
#error_log  logs/error.log  info;

#pid        logs/nginx.pid;

worker_processes  4;
worker_cpu_affinity 00000001 00000010 00000100 00001000;
worker_rlimit_nofile 30000;

events {
    use epoll;
    worker_connections  50000;
}


http {
    include       mime.types;
    default_type  application/octet-stream;

    #log_format  main  '$remote_addr - $remote_user [$time_local] "$request" '
    #                  '$status $body_bytes_sent "$http_referer" '
    #                  '"$http_user_agent" "$http_x_forwarded_for"';

    #access_log  logs/access.log  main;

    sendfile        on;
    #tcp_nopush     on;

    #keepalive_timeout  0;
    keepalive_timeout  30;

    #gzip  on;

    #高并发配置设置
    #client_header_buffer_size    1k;        #默认请求包头信息的缓存
    #large_client_header_buffers  4 4k;      #大请求包头部信息的缓存个数与容量
    proxy_set_header Connection "";
    proxy_http_version 1.1;

    server {
        listen       7777;
        server_name  localhost;

        #charset koi8-r;

        #access_log  logs/host.access.log  main;
        location /httpSocsp/ {
            #proxy_set_header   X-Real-IP $remote_addr;
            #proxy_set_header   Host      $http_host;
            #proxy_http_version 1.1;
            #proxy_set_header Connection "";
            #proxy_connect_timeout 159s;
 	    #proxy_send_timeout   600;
	    #proxy_read_timeout   600;
	    #proxy_buffer_size    64k;
	    #proxy_buffers     16 32k;
	    #proxy_busy_buffers_size 64k;
	    #proxy_temp_file_write_size 64k;
    	    #proxy_pass_header Set-Cookie;
	    #proxy_redirect     off;
	    #proxy_hide_header  Vary;
	    #proxy_set_header   Accept-Encoding '';
	    #proxy_ignore_headers Cache-Control Expires;
	    #proxy_set_header   Referer $http_referer;
	    #proxy_set_header   Host   $host;
	    #proxy_set_header   Cookie $http_cookie;
	    #proxy_set_header   X-Real-IP  $remote_addr;
	    #proxy_set_header X-Forwarded-Host $host;
	    #proxy_set_header X-Forwarded-Server $host;
	    #proxy_set_header X-Forwarded-For $proxy_add_x_forwarded_for;
	    proxy_connect_timeout 4000;
	    proxy_send_timeout 4000;
	    fastcgi_send_timeout 4000;
	    fastcgi_read_timeout 4000;
            proxy_pass http://192.168.0.199:30195/ocsp/;
        }


        location / {
            root   html;
            index  index.html index.htm;
        }

        #error_page  404              /404.html;

        # redirect server error pages to the static page /50x.html
        #
        error_page   500 502 503 504  /50x.html;
        location = /50x.html {
            root   html;
        }

        # proxy the PHP scripts to Apache listening on 127.0.0.1:80
        #
        #location ~ \.php$ {
        #    proxy_pass   http://127.0.0.1;
        #}

        # pass the PHP scripts to FastCGI server listening on 127.0.0.1:9000
        #
        #location ~ \.php$ {
        #    root           html;
        #    fastcgi_pass   127.0.0.1:9000;
        #    fastcgi_index  index.php;
        #    fastcgi_param  SCRIPT_FILENAME  /scripts$fastcgi_script_name;
        #    include        fastcgi_params;
        #}

        # deny access to .htaccess files, if Apache's document root
        # concurs with nginx's one
        #
        #location ~ /\.ht {
        #    deny  all;
        #}
    }


    # another virtual host using mix of IP-, name-, and port-based configuration
    #
    #server {
    #    listen       8000;
    #    listen       somename:8080;
    #    server_name  somename  alias  another.alias;

    #    location / {
    #        root   html;
    #        index  index.html index.htm;
    #    }
    #}


    # HTTPS server
    #
    #server {
    #    listen       443 ssl;
    #    server_name  localhost;

    #    ssl_certificate      cert.pem;
    #    ssl_certificate_key  cert.key;

    #    ssl_session_cache    shared:SSL:1m;
    #    ssl_session_timeout  5m;

    #    ssl_ciphers  HIGH:!aNULL:!MD5;
    #    ssl_prefer_server_ciphers  on;

    #    location / {
    #        root   html;
    #        index  index.html index.htm;
    #    }
    #}

}
3.springboot日志优化(关闭控制台日志可以很大程度提高并发吞吐量)
4.配置是否合理(redis、mysql等) 与gpu相关,如多少核应该配置多少线程数。
5.使用redis存放热数据的时候,只会在一定情况下提高效率。
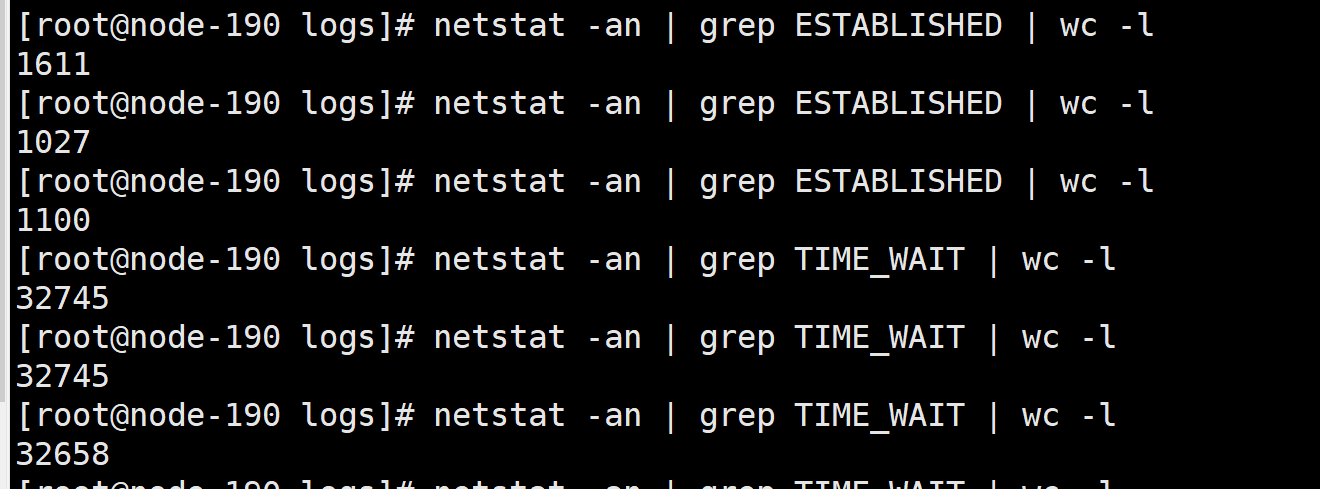
6.socket万级并发的时候,tcp交互问题解决,服务端(TIME_WAIT)过多。
方案一、 java关闭连接时候使用setSoLinger
1、setSoLinger(true, 0),表示不管当前有没有还未发送给对方的数据就直接关闭链接。

2、setSoLinger(true, 1),表示等待1秒如果还有未发送给对方的数据也直接关闭链接。

3、setSoLinger(false, -1),表示无论如何都等未发送给对方的数据发送完毕才按照4次挥手的过程正常关闭链接。
实战优化
windows使用JMeter时候系统设置
1.以Administrator用户登录Windows操作系统。
2.修改TCP回收时间。
	1.在Windows开始菜单中,单击“运行”。
	2.在“运行”对话框中,输入“regedit”后按“Enter”打开注册表编辑器。
	3.在“注册表编辑器”中打开“HKEY_LOCAL_MACHINE\SYSTEM\CurrentControlSet\Services\Tcpip\Parameters”路径。
	4.在“编辑”菜单中,选择“新建 > DWORD (32-位)值”,输入名称“TcpTimedWaitDelay”。
	5.右键单击TcpTimedWaitDelay,选择“修改”。
	6.在“编辑 DWORD(32位)值”对话框的“基数”区域中,选择十进制值为“30”,并“确定”。
	7.关闭注册表编辑器。
3.修改端口范围。
	1.在Windows开始菜单中,单击“运行”。
	2.输入“cmd”并按“Enter”打开命令执行窗口。
	3.执行如下命令修改端口范围。
	4.netsh int ipv4 set dynamicportrange tcp startport=5000 numberofports=60000
4.重启操作系统。
评论区